> ## Documentation Index
> Fetch the complete documentation index at: https://portkey-docs-guide-prompt-api.mintlify.site/llms.txt
> Use this file to discover all available pages before exploring further.
# JWT Authentication
> Configure JWT-based authentication for your organization in Portkey
This feature is available only on the [Enterprise Plan](/product/enterprise-offering) of Portkey.
Portkey supports JWT-based authentication in addition to API Key authentication. Clients can authenticate API requests using a JWT token, which is validated against a configured JWKS (JSON Web Key Set).
Validate your JWT Token before making a LLM request using Portkey.
## Configuring JWT Authentication
JWT authentication can be configured under **Admin Settings** → **Organisation** → **Authentication**.
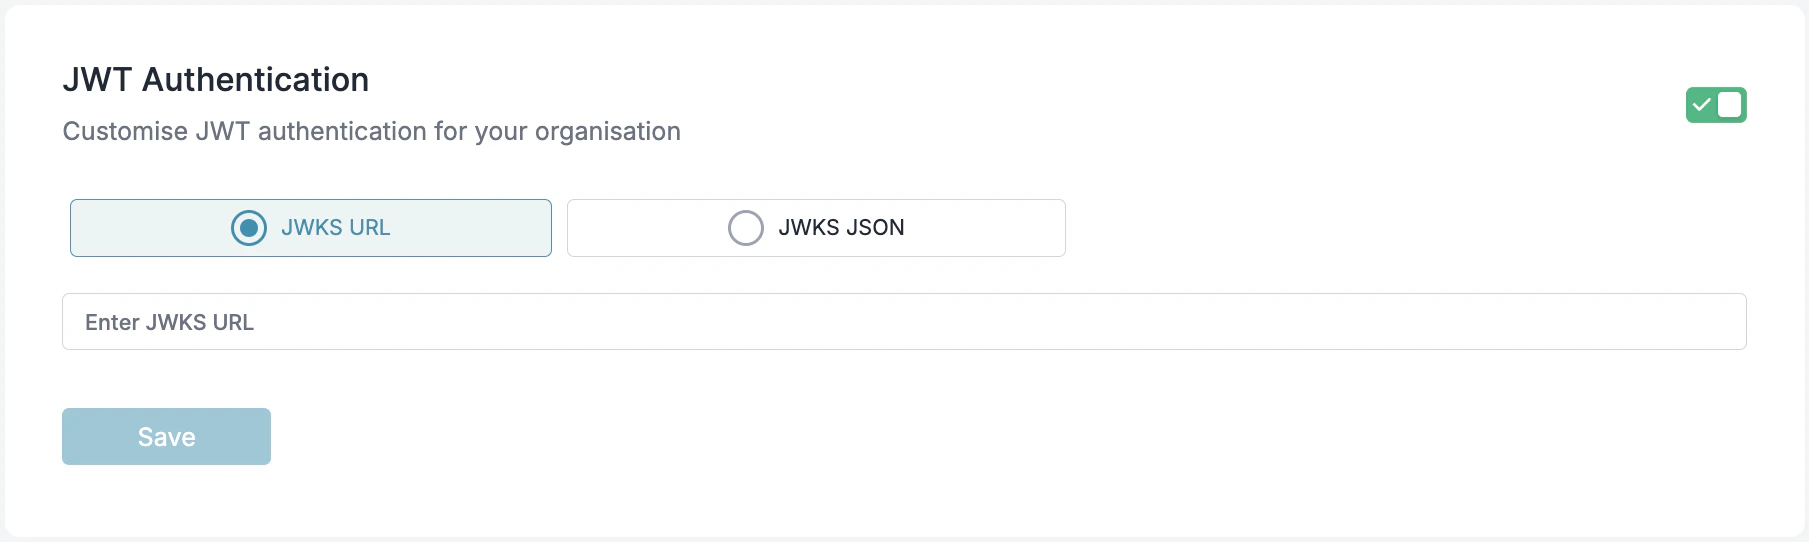 ### JWKS Configuration
To validate JWTs, you must configure one of the following:
* **JWKS URL**: A URL from which the public keys will be dynamically fetched.
* **JWKS JSON**: A static JSON containing public keys.
## Hard Requirements (Read First)
### JWT Header (JOSE Header)
* `alg`: Must be `RS256`. Symmetric algorithms like `HS256` are not accepted.
* `typ`: Must be `JWT`.
* `kid`: Required. The value in the JWT header must match a `kid` in your JWKS.
### Key Requirements
* Key type: RSA
* Key size: 2048 bits or higher
* Your JWKS must expose only the public key parameters (e.g., `kty`, `n`, `e`, `use`, `alg`, `kid`). Do not include private key material.
## JWT Requirements
### Supported Algorithm
* JWTs must be signed using **RS256** (RSA Signature with SHA-256).
### Required Claims
Your JWT payload must contain the following claims:
| **Claim Key** | **Description** |
| -------------------------------------- | -------------------------------------------------- |
| `portkey_oid` / `organisation_id` | Unique identifier for the organization. |
| `portkey_workspace` / `workspace_slug` | Identifier for the workspace. |
| `scope` / `scopes` | Permissions granted by the token. |
| `exp` | Expiration time (as a UNIX timestamp, in seconds). |
* `exp` is mandatory. Tokens without `exp` or with expired `exp` are rejected.
* `iat` and/or `nbf` are recommended but optional.
### Optional Claims
| **Claim Key** | **Description** |
| -------------- | ---------------------------------------------------------------------------------------------------------------------------------------------------------- |
| `defaults` | Object containing default settings applied to all requests made with this token. See [Embedding Default Configs](#embedding-default-configs-in-jwt) below. |
| `usage_limits` | Usage limits to enforce on requests made with this token. |
| `rate_limits` | Rate limits to enforce on requests made with this token. |
### User Identification
Portkey identifies users in the following order of precedence for logging and metrics:
1. `email_id`
2. `sub`
3. `uid`
## End-to-End Working Example (Generate → Configure JWKS → Sign → Call)
The following example uses Node.js and the `jose` library to:
1. generate an RSA key pair,
2. create a JWKS containing the public key,
3. sign a JWT with the private key,
4. call Portkey with the JWT.
### 1) Prerequisites
```sh theme={null}
# Node 18+ recommended
npm init -y
npm install jose
```
### 2) Generate RSA Keys, Create JWKS, and Sign a JWT (NodeJS)
Create `generate-and-sign-jwt.mjs`:
```js theme={null}
import { generateKeyPair, exportJWK, SignJWT } from 'jose';
import { randomUUID } from 'node:crypto';
import fs from 'node:fs';
const { publicKey, privateKey } = await generateKeyPair('RS256');
// Create a public JWK for JWKS
const publicJwk = await exportJWK(publicKey);
publicJwk.kty = 'RSA';
publicJwk.use = 'sig';
publicJwk.alg = 'RS256';
publicJwk.kid = randomUUID();
const jwks = { keys: [publicJwk] };
fs.writeFileSync('jwks.json', JSON.stringify(jwks, null, 2));
const now = Math.floor(Date.now() / 1000);
// Sign a JWT with the private key
const jwt = await new SignJWT({
portkey_oid: '',
portkey_workspace: '',
scope: ['completions.write', 'logs.view'],
email_id: 'user@example.com',
sub: '',
// Optional: embed default config and metadata
// defaults: { config_id: 'pc-your-config-id', metadata: { environment: 'production' } }
})
.setProtectedHeader({ alg: 'RS256', kid: publicJwk.kid, typ: 'JWT' })
.setIssuedAt(now)
.setExpirationTime(now + 60 * 60) // 1 hour
.sign(privateKey);
fs.writeFileSync('token.jwt', jwt);
console.log('JWKS written to jwks.json');
console.log('JWT written to token.jwt');
console.log('kid:', publicJwk.kid);
```
Run it:
```sh theme={null}
node generate-and-sign-jwt.mjs
```
This produces:
* `jwks.json`: A JWKS containing your public key (with a `kid`).
* `token.jwt`: A signed JWT ready to use with Portkey.
### 3) Add Your Public Key to Portkey (JWKS)
In the Portkey Admin UI:
* Navigate to **Admin Settings** → **Organisation** → **Authentication**.
* Choose either:
* JWKS URL: Host `jwks.json` at a reachable HTTPS URL and paste that URL.
* JWKS JSON: Paste the entire contents of your generated `jwks.json`.
* Save changes.
Ensure the `kid` in your JWT header matches a key in the configured JWKS.
### 4) Call Portkey Using the Signed JWT
Send the JWT in the `x-portkey-api-key` header.
```sh theme={null}
curl https://api.portkey.ai/v1/chat/completions \
-H "Content-Type: application/json" \
-H "x-portkey-api-key: $(cat token.jwt)" \
-H "x-portkey-provider: @" \
-d '{
"model": "your-model-id",
"messages": [
{ "role": "user", "content": "Hello!" }
]
}'
```
If your JWT, JWKS, and claims are correct, the request will authenticate and succeed.
If you prefer Python for signing, you can generate the RSA key pair using your preferred method, ensure the public key is present in your JWKS with a matching `kid`, and use a library like `PyJWT` to sign with `RS256` while setting the header `{ "alg": "RS256", "typ": "JWT", "kid": "" }`.
## Authentication Process
1. The client sends an HTTP request with the JWT in the `x-portkey-api-key` header:
```http theme={null}
x-portkey-api-key:
```
2. The server validates the JWT:
* Verifies the signature using the JWKS.
* Checks if the token is expired.
* Ensures the required claims are present.
3. If valid, the request is authenticated, and user details are extracted for authorization and logging.
4. If invalid, the request is rejected with an HTTP **401 Unauthorized** response.
## Authorization & Scopes
Once the JWT is validated, the server checks for the required **scope**. Scopes can be provided in the JWT as either a single string or an array of strings using the `scope` or `scopes` claim.
View workspace details
Modify workspace settings
List available workspaces
Export logs to external systems
List available logs
View log details
Create and modify logs
Access analytics data
Create new configurations
Update existing configurations
Delete configurations
View configuration details
List available configurations
Create new providers
Update existing providers
Delete providers
Duplicate existing providers
View provider details
List available providers
Create new workspace users
View workspace user details
Update workspace user settings
Remove users from workspace
List workspace users
Render prompt templates
Create and manage completions
Scopes can also be prefixed with `portkey.` (e.g., `portkey.completions.write`).
JWT tokens with appropriate scopes function identically to workspace API keys, providing access to workspace-specific operations. They cannot be used as organization API keys, which have broader administrative permissions across all workspaces.
#### Example JWT Header
```json theme={null}
{
"alg": "RS256",
"typ": "JWT",
"kid": ""
}
```
* This matches the signing example (`.setProtectedHeader({ alg: 'RS256', kid: publicJwk.kid, typ: 'JWT' })`).
* Ensure `kid` exactly matches one key in your configured JWKS.
## Embedding Default Configs in JWT
You can embed a default [config](/product/ai-gateway/configs) directly in the JWT payload using the `defaults` claim. This works the same way as [attaching default configs to API keys](/product/administration/enforce-default-config), but lets you control it per-token — useful when different users or services need different routing rules.
The `defaults` object supports the following fields:
| **Field** | **Description** |
| ----------- | ----------------------------------------------------------------------------------- |
| `config_id` | The ID of the config to apply as the default for all requests made with this token. |
| `metadata` | A JSON object with custom metadata to attach to all requests. |
When a JWT with a `defaults.config_id` is used, Portkey validates that the config belongs to the same organization before applying it. If the config is not found or doesn't belong to the org, the default is ignored.
This follows the same precedence rules as API key default configs — if a user explicitly passes a config ID in their request headers, it will override the JWT default unless config override is disabled at the workspace level.
### Example JWT Payload with Defaults
```json theme={null}
{
"portkey_oid": "3ed1b666-7e3d-416a-9260-da10e1610d1a",
"portkey_workspace": "ws-shared-8622d1",
"scope": ["completions.write", "logs.view"],
"email_id": "user@example.com",
"sub": "user-123",
"exp": 1735689600,
"defaults": {
"config_id": "pc-your-config-id",
"metadata": {
"environment": "production",
"team": "backend"
}
}
}
```
## Example JWT Payload
```json theme={null}
{
"portkey_oid": "3ed1b666-7e3d-416a-9260-da10e1610d1a",
"portkey_workspace": "ws-shared-8622d1",
"scope": ["completions.write", "logs.view"],
"email_id": "user@example.com",
"sub": "user-123",
"exp": 1735689600
}
```
## Making API Calls with JWT Authentication
Once you have a valid JWT token, you can use it to authenticate your API calls to Portkey. Below are examples showing how to use JWT authentication with different SDKs.
Install the Portkey SDK with npm
```sh theme={null}
npm install portkey-ai
```
```ts Chat Completions theme={null}
import Portkey from 'portkey-ai';
const client = new Portkey({
apiKey: '', // Use JWT token instead of API key
provider: '@'
});
async function main() {
const response = await client.chat.completions.create({
messages: [{ role: "user", content: "Hello, how are you today?" }],
model: "your-model-id",
});
console.log(response.choices[0].message.content);
}
main();
```
Install the Portkey SDK with pip
```sh theme={null}
pip install portkey-ai
```
```py Chat Completions theme={null}
from portkey_ai import Portkey
client = Portkey(
api_key = "", # Use JWT token instead of API key,
provider = "@"
)
response = client.chat.completions.create(
model="your-model-id",
messages=[
{"role": "system", "content": "You are a helpful assistant."},
{"role": "user", "content": "Hello!"}
]
)
print(response.choices[0].message)
```
```sh Chat Completions theme={null}
curl https://api.portkey.ai/v1/chat/completions \
-H "Content-Type: application/json" \
-H "x-portkey-api-key: " \
-H "x-portkey-provider: @" \
-d '{
"model": "your-model-id",
"messages": [
{ "role": "user", "content": "Hello!" }
]
}'
```
Install the OpenAI & Portkey SDKs with pip
```sh theme={null}
pip install openai portkey-ai
```
```py Chat Completions theme={null}
from openai import OpenAI
from portkey_ai import createHeaders, PORTKEY_GATEWAY_URL
client = OpenAI(
api_key="xx",
base_url=PORTKEY_GATEWAY_URL,
default_headers=createHeaders(
api_key="" # Use JWT token instead of API key
)
)
completion = client.chat.completions.create(
model="@/your-model-id",
messages=[
{"role": "system", "content": "You are a helpful assistant."},
{"role": "user", "content": "Hello!"}
]
)
print(completion.choices[0].message)
```
Install the OpenAI & Portkey SDKs with npm
```sh theme={null}
npm install openai portkey-ai
```
```ts Chat Completions theme={null}
import OpenAI from 'openai';
import { PORTKEY_GATEWAY_URL, createHeaders } from 'portkey-ai'
const openai = new OpenAI({
apiKey: 'xx',
baseURL: PORTKEY_GATEWAY_URL,
defaultHeaders: createHeaders({
apiKey: "" // Use JWT token instead of API key
})
});
async function main() {
const completion = await openai.chat.completions.create({
messages: [{ role: 'user', content: 'Say this is a test' }],
model: '@/your-model-id'
});
console.log(completion.choices[0].message);
}
main();
```
## Troubleshooting “Invalid API Key” Errors
* **Wrong algorithm**: Only `RS256` is accepted; `HS256` or others will fail.
* **Missing or mismatched `kid`**: Your JWT header must include a `kid` that matches a key in the JWKS.
* **Incorrect header usage**: Send the raw JWT in `x-portkey-api-key` without a `Bearer ` prefix.
* **Expired or missing `exp`**: The `exp` claim is required and must be in the future. Allow for small clock skew.
* **Private vs Public key mix-up**: Your JWKS must contain only the public key parameters. The private key is used only for signing; never paste it into the JWKS JSON.
* **Wrong org/workspace identifiers**: `portkey_oid` (or `organisation_id`) and `portkey_workspace` (or `workspace_slug`) must correspond to valid identifiers in your Portkey tenant.
* **Scopes missing for the API you call**: E.g., chat completions needs `completions.write`.
* **Unreachable JWKS URL**: If using a URL, it must be publicly reachable by Portkey. For static JSON, ensure the pasted JSON is valid and includes `keys: [...]`.
All Invalid JWT errors are logged in the Audit Logs.
Sample error message:
```
"jwtToken": "ey****bt",
"error": "Error Verifying JWT token: Signing Key Not Found",
```
## Caching & Token Revocation
* JWTs are cached until they expire to reduce validation overhead.
* If you rotate keys:
* Publish the new public key in JWKS with a new `kid`.
* Start issuing tokens signed by the new private key (with the new `kid`).
* Old tokens will remain valid until their `exp` is reached.
### JWKS Configuration
To validate JWTs, you must configure one of the following:
* **JWKS URL**: A URL from which the public keys will be dynamically fetched.
* **JWKS JSON**: A static JSON containing public keys.
## Hard Requirements (Read First)
### JWT Header (JOSE Header)
* `alg`: Must be `RS256`. Symmetric algorithms like `HS256` are not accepted.
* `typ`: Must be `JWT`.
* `kid`: Required. The value in the JWT header must match a `kid` in your JWKS.
### Key Requirements
* Key type: RSA
* Key size: 2048 bits or higher
* Your JWKS must expose only the public key parameters (e.g., `kty`, `n`, `e`, `use`, `alg`, `kid`). Do not include private key material.
## JWT Requirements
### Supported Algorithm
* JWTs must be signed using **RS256** (RSA Signature with SHA-256).
### Required Claims
Your JWT payload must contain the following claims:
| **Claim Key** | **Description** |
| -------------------------------------- | -------------------------------------------------- |
| `portkey_oid` / `organisation_id` | Unique identifier for the organization. |
| `portkey_workspace` / `workspace_slug` | Identifier for the workspace. |
| `scope` / `scopes` | Permissions granted by the token. |
| `exp` | Expiration time (as a UNIX timestamp, in seconds). |
* `exp` is mandatory. Tokens without `exp` or with expired `exp` are rejected.
* `iat` and/or `nbf` are recommended but optional.
### Optional Claims
| **Claim Key** | **Description** |
| -------------- | ---------------------------------------------------------------------------------------------------------------------------------------------------------- |
| `defaults` | Object containing default settings applied to all requests made with this token. See [Embedding Default Configs](#embedding-default-configs-in-jwt) below. |
| `usage_limits` | Usage limits to enforce on requests made with this token. |
| `rate_limits` | Rate limits to enforce on requests made with this token. |
### User Identification
Portkey identifies users in the following order of precedence for logging and metrics:
1. `email_id`
2. `sub`
3. `uid`
## End-to-End Working Example (Generate → Configure JWKS → Sign → Call)
The following example uses Node.js and the `jose` library to:
1. generate an RSA key pair,
2. create a JWKS containing the public key,
3. sign a JWT with the private key,
4. call Portkey with the JWT.
### 1) Prerequisites
```sh theme={null}
# Node 18+ recommended
npm init -y
npm install jose
```
### 2) Generate RSA Keys, Create JWKS, and Sign a JWT (NodeJS)
Create `generate-and-sign-jwt.mjs`:
```js theme={null}
import { generateKeyPair, exportJWK, SignJWT } from 'jose';
import { randomUUID } from 'node:crypto';
import fs from 'node:fs';
const { publicKey, privateKey } = await generateKeyPair('RS256');
// Create a public JWK for JWKS
const publicJwk = await exportJWK(publicKey);
publicJwk.kty = 'RSA';
publicJwk.use = 'sig';
publicJwk.alg = 'RS256';
publicJwk.kid = randomUUID();
const jwks = { keys: [publicJwk] };
fs.writeFileSync('jwks.json', JSON.stringify(jwks, null, 2));
const now = Math.floor(Date.now() / 1000);
// Sign a JWT with the private key
const jwt = await new SignJWT({
portkey_oid: '',
portkey_workspace: '',
scope: ['completions.write', 'logs.view'],
email_id: 'user@example.com',
sub: '',
// Optional: embed default config and metadata
// defaults: { config_id: 'pc-your-config-id', metadata: { environment: 'production' } }
})
.setProtectedHeader({ alg: 'RS256', kid: publicJwk.kid, typ: 'JWT' })
.setIssuedAt(now)
.setExpirationTime(now + 60 * 60) // 1 hour
.sign(privateKey);
fs.writeFileSync('token.jwt', jwt);
console.log('JWKS written to jwks.json');
console.log('JWT written to token.jwt');
console.log('kid:', publicJwk.kid);
```
Run it:
```sh theme={null}
node generate-and-sign-jwt.mjs
```
This produces:
* `jwks.json`: A JWKS containing your public key (with a `kid`).
* `token.jwt`: A signed JWT ready to use with Portkey.
### 3) Add Your Public Key to Portkey (JWKS)
In the Portkey Admin UI:
* Navigate to **Admin Settings** → **Organisation** → **Authentication**.
* Choose either:
* JWKS URL: Host `jwks.json` at a reachable HTTPS URL and paste that URL.
* JWKS JSON: Paste the entire contents of your generated `jwks.json`.
* Save changes.
Ensure the `kid` in your JWT header matches a key in the configured JWKS.
### 4) Call Portkey Using the Signed JWT
Send the JWT in the `x-portkey-api-key` header.
```sh theme={null}
curl https://api.portkey.ai/v1/chat/completions \
-H "Content-Type: application/json" \
-H "x-portkey-api-key: $(cat token.jwt)" \
-H "x-portkey-provider: @" \
-d '{
"model": "your-model-id",
"messages": [
{ "role": "user", "content": "Hello!" }
]
}'
```
If your JWT, JWKS, and claims are correct, the request will authenticate and succeed.
If you prefer Python for signing, you can generate the RSA key pair using your preferred method, ensure the public key is present in your JWKS with a matching `kid`, and use a library like `PyJWT` to sign with `RS256` while setting the header `{ "alg": "RS256", "typ": "JWT", "kid": "" }`.
## Authentication Process
1. The client sends an HTTP request with the JWT in the `x-portkey-api-key` header:
```http theme={null}
x-portkey-api-key:
```
2. The server validates the JWT:
* Verifies the signature using the JWKS.
* Checks if the token is expired.
* Ensures the required claims are present.
3. If valid, the request is authenticated, and user details are extracted for authorization and logging.
4. If invalid, the request is rejected with an HTTP **401 Unauthorized** response.
## Authorization & Scopes
Once the JWT is validated, the server checks for the required **scope**. Scopes can be provided in the JWT as either a single string or an array of strings using the `scope` or `scopes` claim.
View workspace details
Modify workspace settings
List available workspaces
Export logs to external systems
List available logs
View log details
Create and modify logs
Access analytics data
Create new configurations
Update existing configurations
Delete configurations
View configuration details
List available configurations
Create new providers
Update existing providers
Delete providers
Duplicate existing providers
View provider details
List available providers
Create new workspace users
View workspace user details
Update workspace user settings
Remove users from workspace
List workspace users
Render prompt templates
Create and manage completions
Scopes can also be prefixed with `portkey.` (e.g., `portkey.completions.write`).
JWT tokens with appropriate scopes function identically to workspace API keys, providing access to workspace-specific operations. They cannot be used as organization API keys, which have broader administrative permissions across all workspaces.
#### Example JWT Header
```json theme={null}
{
"alg": "RS256",
"typ": "JWT",
"kid": ""
}
```
* This matches the signing example (`.setProtectedHeader({ alg: 'RS256', kid: publicJwk.kid, typ: 'JWT' })`).
* Ensure `kid` exactly matches one key in your configured JWKS.
## Embedding Default Configs in JWT
You can embed a default [config](/product/ai-gateway/configs) directly in the JWT payload using the `defaults` claim. This works the same way as [attaching default configs to API keys](/product/administration/enforce-default-config), but lets you control it per-token — useful when different users or services need different routing rules.
The `defaults` object supports the following fields:
| **Field** | **Description** |
| ----------- | ----------------------------------------------------------------------------------- |
| `config_id` | The ID of the config to apply as the default for all requests made with this token. |
| `metadata` | A JSON object with custom metadata to attach to all requests. |
When a JWT with a `defaults.config_id` is used, Portkey validates that the config belongs to the same organization before applying it. If the config is not found or doesn't belong to the org, the default is ignored.
This follows the same precedence rules as API key default configs — if a user explicitly passes a config ID in their request headers, it will override the JWT default unless config override is disabled at the workspace level.
### Example JWT Payload with Defaults
```json theme={null}
{
"portkey_oid": "3ed1b666-7e3d-416a-9260-da10e1610d1a",
"portkey_workspace": "ws-shared-8622d1",
"scope": ["completions.write", "logs.view"],
"email_id": "user@example.com",
"sub": "user-123",
"exp": 1735689600,
"defaults": {
"config_id": "pc-your-config-id",
"metadata": {
"environment": "production",
"team": "backend"
}
}
}
```
## Example JWT Payload
```json theme={null}
{
"portkey_oid": "3ed1b666-7e3d-416a-9260-da10e1610d1a",
"portkey_workspace": "ws-shared-8622d1",
"scope": ["completions.write", "logs.view"],
"email_id": "user@example.com",
"sub": "user-123",
"exp": 1735689600
}
```
## Making API Calls with JWT Authentication
Once you have a valid JWT token, you can use it to authenticate your API calls to Portkey. Below are examples showing how to use JWT authentication with different SDKs.
Install the Portkey SDK with npm
```sh theme={null}
npm install portkey-ai
```
```ts Chat Completions theme={null}
import Portkey from 'portkey-ai';
const client = new Portkey({
apiKey: '', // Use JWT token instead of API key
provider: '@'
});
async function main() {
const response = await client.chat.completions.create({
messages: [{ role: "user", content: "Hello, how are you today?" }],
model: "your-model-id",
});
console.log(response.choices[0].message.content);
}
main();
```
Install the Portkey SDK with pip
```sh theme={null}
pip install portkey-ai
```
```py Chat Completions theme={null}
from portkey_ai import Portkey
client = Portkey(
api_key = "", # Use JWT token instead of API key,
provider = "@"
)
response = client.chat.completions.create(
model="your-model-id",
messages=[
{"role": "system", "content": "You are a helpful assistant."},
{"role": "user", "content": "Hello!"}
]
)
print(response.choices[0].message)
```
```sh Chat Completions theme={null}
curl https://api.portkey.ai/v1/chat/completions \
-H "Content-Type: application/json" \
-H "x-portkey-api-key: " \
-H "x-portkey-provider: @" \
-d '{
"model": "your-model-id",
"messages": [
{ "role": "user", "content": "Hello!" }
]
}'
```
Install the OpenAI & Portkey SDKs with pip
```sh theme={null}
pip install openai portkey-ai
```
```py Chat Completions theme={null}
from openai import OpenAI
from portkey_ai import createHeaders, PORTKEY_GATEWAY_URL
client = OpenAI(
api_key="xx",
base_url=PORTKEY_GATEWAY_URL,
default_headers=createHeaders(
api_key="" # Use JWT token instead of API key
)
)
completion = client.chat.completions.create(
model="@/your-model-id",
messages=[
{"role": "system", "content": "You are a helpful assistant."},
{"role": "user", "content": "Hello!"}
]
)
print(completion.choices[0].message)
```
Install the OpenAI & Portkey SDKs with npm
```sh theme={null}
npm install openai portkey-ai
```
```ts Chat Completions theme={null}
import OpenAI from 'openai';
import { PORTKEY_GATEWAY_URL, createHeaders } from 'portkey-ai'
const openai = new OpenAI({
apiKey: 'xx',
baseURL: PORTKEY_GATEWAY_URL,
defaultHeaders: createHeaders({
apiKey: "" // Use JWT token instead of API key
})
});
async function main() {
const completion = await openai.chat.completions.create({
messages: [{ role: 'user', content: 'Say this is a test' }],
model: '@/your-model-id'
});
console.log(completion.choices[0].message);
}
main();
```
## Troubleshooting “Invalid API Key” Errors
* **Wrong algorithm**: Only `RS256` is accepted; `HS256` or others will fail.
* **Missing or mismatched `kid`**: Your JWT header must include a `kid` that matches a key in the JWKS.
* **Incorrect header usage**: Send the raw JWT in `x-portkey-api-key` without a `Bearer ` prefix.
* **Expired or missing `exp`**: The `exp` claim is required and must be in the future. Allow for small clock skew.
* **Private vs Public key mix-up**: Your JWKS must contain only the public key parameters. The private key is used only for signing; never paste it into the JWKS JSON.
* **Wrong org/workspace identifiers**: `portkey_oid` (or `organisation_id`) and `portkey_workspace` (or `workspace_slug`) must correspond to valid identifiers in your Portkey tenant.
* **Scopes missing for the API you call**: E.g., chat completions needs `completions.write`.
* **Unreachable JWKS URL**: If using a URL, it must be publicly reachable by Portkey. For static JSON, ensure the pasted JSON is valid and includes `keys: [...]`.
All Invalid JWT errors are logged in the Audit Logs.
Sample error message:
```
"jwtToken": "ey****bt",
"error": "Error Verifying JWT token: Signing Key Not Found",
```
## Caching & Token Revocation
* JWTs are cached until they expire to reduce validation overhead.
* If you rotate keys:
* Publish the new public key in JWKS with a new `kid`.
* Start issuing tokens signed by the new private key (with the new `kid`).
* Old tokens will remain valid until their `exp` is reached.